In this tutorial I will show how to integrate iAd and supporting both portrait and landscape ad into your app.
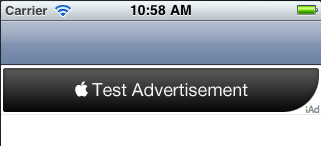
Here is what we will get working after this tutorial

Step 1: Base SDK vs Deployment Target
The first step to use iAd is to make sure our project has the right Base SDK and iPhone OS Deployment Target selected.
For those of you confused about the difference between the Base SDK and Deployment Target (like I was for quite some time!), here’s what they mean:
* The Base SDK is the version of the SDK you are linking against. Your app can use any classes or functions available in the version of the SDK you choose here – as long as they are available on the actual device the code runs on.
* The Deployment Target is the earliest possible version of the SDK your code can run on. This can be an earlier version than the Base SDK – in fact you often want to set it to be earlier to ensure that as many different versions of the OS can run your code as possible!
The tricky bit is what happens when you want to use a class, function, or framework available in one version of the OS if it’s available, but still work on the old version of the OS if it isn’t.
For this tutorial, we will stick on using iOS 4 (or later) as target SDK since iAd was introduced after this version only.
But as a side note, lets also explain the case where we want to set things up so that our code can use stuff available in iOS 4.0 (such as iAd), but still run on as many devices as reasonable (3.0+). Just a few more steps are involved in it.
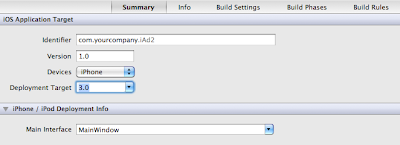
So first let’s set iOs 4.0(or later) as the base SDK. Then, let’s set iPhone OS 3.0 as the iPhone OS Deployment Target.

You should now be able to compile and run your app (use the iPhone simulator), and try it out on an iPhone 4 simulator. But if you try to run it on iPhone 3 simulator, your app will crash. Lets fix it up.
Linking Against the iAd Framework
The next thing we need to do is add the iAd framework to the project. You can do this by right clicking on Frameworks, choosing “Add\Existing Frameworks…”, and choosing “iAd.framework” (for Xcode 3) or adding "iAd.framework" under Build Phases of your applicatin Target module.

The problem is, if that is all we do our code will break on older devices that don’t have the iAd framework.
To fix this, we need to weak link against the iAd framework. Expand the Targets directory, right click on PortMe, and choose “Get Info”. Click the Build tab, make sure “All Configurations” is selected, and navigate to Linking\Other Linker Flags. Double click on that entry, click the “+” button, and type “-weak_framework iAd”.
Click OK, and then try your app on the iPad simulator again and viola – it should work!
Step 2: Start iAd integration programmatically (.h file)
First make the changes in your View Controller .h file to look like this.

We first include the iAd headers and mark the view controller as implementing the ADBannerViewDelegate. This way, we can receive events as ads become available or not.
We then declare the ADBannerView which will be your view holding and displaying the ads.We also declare a variable (bannerIsVisible) to keep track of our iAd banner view, and whether or not it’s currently visible.
Step 3: Some memory management in .m file

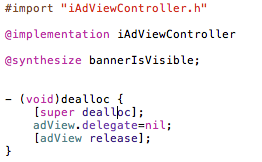
Fist synthesize your variable bannerIsVisible. Then do some memory management stuff by releasing your ADBannerView's instanceadView in dealloc method.
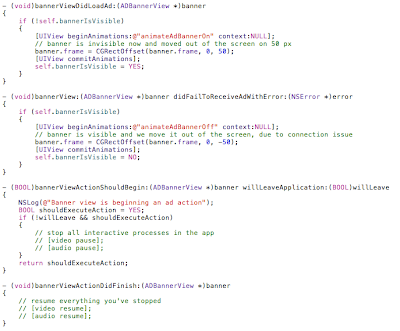
Step 4: Main 4 delegate methods doing all heavy-lifting for iAd integration

The first method is called up when the Banner View is loaded for the first time and ads become available for display. Here we set the variable bannerIsVisible to YES.
- (void)bannerViewDidLoadAd:(ADBannerView *)banner
The second method is called upon the failure to load the Ad View due to any reason (no internet connection or other..)
- (void)bannerView:(ADBannerView *)banner didFailToReceiveAdWithError:(NSError *)error
Thisd method is called up when user taps on the iAd and the full-screen iAd gets loaded up. We should pause our main application at this point as the user is interating with the ad this whole time and we free-up maximum resources as our app does not needs it at that time.
- (BOOL)bannerViewActionShouldBegin:(ADBannerView *)banner willLeaveApplication:(BOOL)willLeave
The last method is called when user closes the iAd. Here we should resume our application processes again.
- (void)bannerViewActionDidFinish:(ADBannerView *)banner
Step 5: Initialize iAd in viewDidLoad Method
We need to initialize the ADBannerView in our viewDidLoad method ie; when our view gets loaded. Here we set all the required variables of ADBannerView (like frame, contentSize etc.) and add this view as a subview to our main ViewController's view.

Now, Build and Run the code, you should get your app up and running and iAd getting displayed on the screen.
Step 6: Support for multiple orientations
Till now we are able to integrate iAd into our application but it supports only portrait mode. Lets get it supported in all modes.

First we enable our application's support for all orientations and then we call a method
- (void)fixupAdView:(UIInterfaceOrientation)toInterfaceOrientationwhenever the orientation of the device gets changed.
fixupAdView:
- (void)fixupAdView:(UIInterfaceOrientation)toInterfaceOrientation {
if (adView != nil) {
if (UIInterfaceOrientationIsLandscape(toInterfaceOrientation)) {
[adView setCurrentContentSizeIdentifier:ADBannerContentSizeIdentifierLandscape];
} else {
[adView setCurrentContentSizeIdentifier:ADBannerContentSizeIdentifierPortrait];
}
[adView setFrame:CGRectOffset([adView frame], 0, -[self getBannerHeight:toInterfaceOrientation])];
}
}
And here's the method which gives the Banner height depending on device's current orientation
- (int)getBannerHeight:(UIDeviceOrientation)orientation {
if (UIInterfaceOrientationIsLandscape(orientation)) {
return 32;
} else {
return 50;
}
}
That's all required to make iAd support multiple orientation.
The best feature of this code is that it could be used for any iOS application (iPhone as well as iPad app) without any change.
Get the final code (and more polished one) from here.
You must now have a complete overview of integrating iAd into your next app. So get started!


